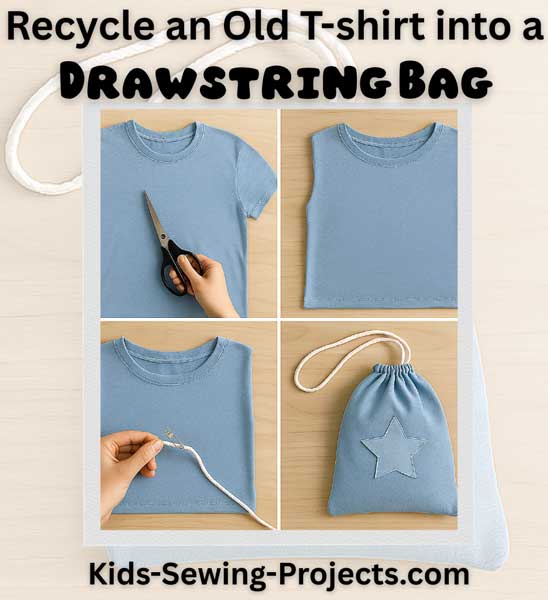
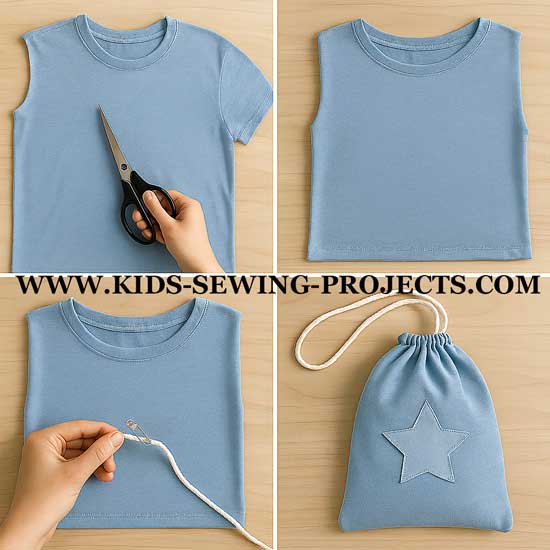
T Shirt Drawstring Bag
Directions for a T shirt Drawstring Bag, an easy sewing project that you can recycle your old tshirts.
Sewing Materials Available

T Shirt Drawstring Bag Sewing Tutorial
1. Cut t-shirt starting next to the collar and cut straight down length as desired.2.Turn t shirt right sides together, sew sides and bottom.
3. Turn right sides out. Cut small slit in collar.
4. Insert cording, yarn or ribbon with safety pin. Push pin through collar.
Remove pin and you have your t-shirt drawstring bag.
**If you'd like to design your bag, try adding an applique or other embellishments you like.
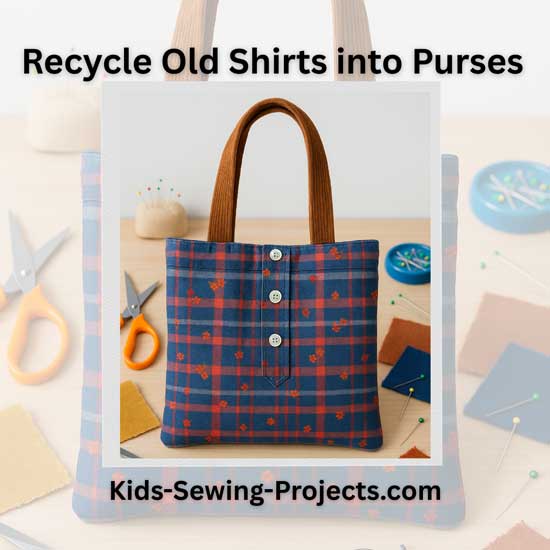
Sewing a Purse out of an Old Blouse
by Julie Larsen--Vintage Sewing School (Nacogdoches, TX)Another fun purse project similar to the t shirt drawstring bag but using a shirt or button up shirt
1. Find an old blouse or skirt that you like the print on.
2. Figure out what size you want to make your purse. This can vary depending on size of clothes. For example you can make a 12 inch by 12 inch purse.
3. If you are using a blouse and it buttons down, keep the buttons closed and cut out your 12 x 12 (will use this size for our example). The bottom of the blouse will actually be your top since it already has a hem that is sewn up.
4. You will need to put the pieces right sides together and sew around the side and bottom part of the bag leaving the "hem area" open to be the top of the purse.
5. You may need to add some extra stitching around any button opening at top to hold it closed. (You can also open the purse with the buttons if you so desire or sew this area closed--it is up to you.)
6. Now we need purse handles. I tried to make purse handles out of my blouse, but that wasn't really strong enough. I suggest you find a stronger fabric such as corduroy or heavier material type or purchase some handles already made to attach. I used corduroy fabric for my example. I just measured how long I wanted it and made it about 2 inches wide and cut it out.
7. If you are making handles, you will need to sew them right sides together and turn them or you can put wrong sides together and put a decorative type stitch to hold the handles together (as the stitching will show). If you are not making handles, see next step.
8. Once you have your handles ready, then you attach the handles at the sides.
9. Optional Pocket--You can add pockets to the purse during the initial cutting out phase--cut out pockets and attach to front/back of purse before stitching the purse together.
10. Your purse is now ready to use.
Related Beginning Projects:
~Beginning Lessons, ~Bandanna Tote Bag with an Inside Lining, ~Sew a Simple Belt, ~Bottle Bag, ~Christmas Stockings, ~Circle Pillow,~ Coasters, ~Couch Caddy, ~Dinner Placemat, ~Dress Up Your Jeans, Foam Pencil Case, ~Gathered Apron,~Hair Scrunchy, ~How to Sew Drawstring Bags, ~How to Sew Tote Bags, ~Jean Purse, ~Jean Apron, ~Lap Desk, ~Neck Pillow, ~Patchwork Tote Bag, ~Patchwork Pillow Cover, ~Pillow with Pocket, ~Pillow Cover with Ties, ~Pillow with Trim,~Pocket Purse,~ Sew a Pot Holder, ~Stuffed Animal, ~ Stuffed Ball, ~T-shirt Drawstring Bag, ~Sew a Card, ~No Sew Projects, ~Sewing Safety, ~Felt Patterns~Pillowcase Scarf, ~Felt Tooth Fairy, ~Stuffed Elephant, ~Stuffed Monster,~ Pretty Purse, ~Mini Stuffed Dog, ~Stuffed Bear, ~Baby Receiving Blanket,~ Baby doll blanket & pillow,~Patchwork Skirt, ~Reusable Snack Baggie, ~Glasses Case, ~Sew Tablecloth, ~ Pocket Pillow
Follow Kids Sewing Projects


[?] Subscribe To This Site

Copyright, Debbie Madson, Madson Web Publishing, LLC
All rights reserved.
The material on this site is for educational purposes.
Nothing on this page is public domain.

All rights reserved.
The material on this site is for educational purposes.
Nothing on this page is public domain.