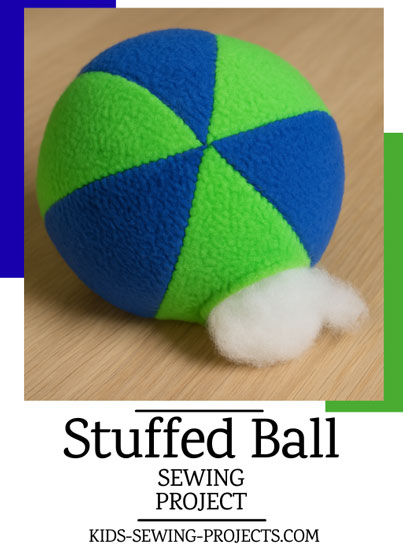
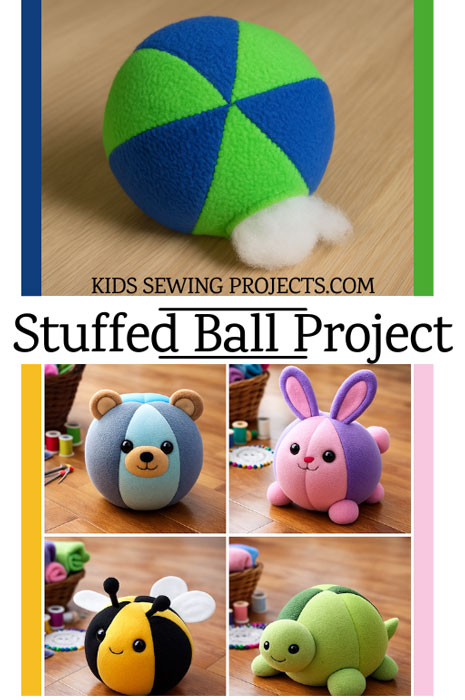
Stuffed Ball
Sewing a stuffed fabric ball is a fun, hands-on project perfect for young beginners who are just learning how to stitch. Using only six simple fleece pieces, kids can create a soft, colorful ball that's great for playing, tossing, or using as the base for adorable stuffed animal creations. This project teaches important sewing skills- pinning, stitching curved edges, stuffing, and hand-sewing an opening closed- all while giving kids the freedom to choose colors, textures, and even turn their ball into a unique character. It's an easy, confidence-building sewing activity that grows right along with their creativity!
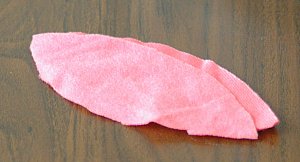
First step for this stuffed ball project is to create a ball pattern piece. Using a piece of paper, create an oval shape with a pointed end. The length should be about 6 1/2 inches from tip to tip. You can fold your paper in half and use the fold line to create the bottom half of your pattern. After it is cut out you can unfold your paper and have a whole piece.
After cutting out your pattern, use the pattern to cut out 6 pieces from your material. I will take you through the directions with pictures now.
Sewing Materials Available

Stuffed Ball Sewing Project
You will need:- Fleece material~ For fun, you can try 2 coordinating colors of material.
Pin two shapes together and sew along edges.
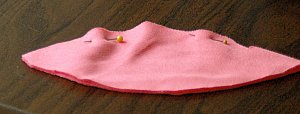
Continue with one more piece until you have 3 pieces sewn together. Set aside. Using the 3 other pieces, sew together as done previously. Now you will have two halves of the ball.
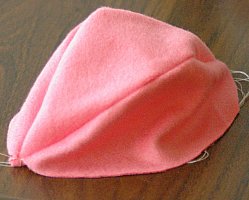
Sew two ball halves together down edges. On the final side leave a small opening in the middle for stuffing, as shown above.
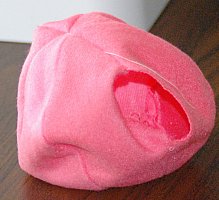
Stuff ball with batting or old pieces of material then hand sew opening closed.
Leave your ball as is to play with or it is a good starter for children to create their own stuffed animal sewing project.
Turning Your 6-Piece Stuffed Ball Into Stuffed Animals
Once kids learn how to sew the basic 6-piece fleece ball, they can take the project to the next level by transforming their ball into a cute stuffed animal! Every animal begins the same way- with six curved fleece pieces sewn together to form a sphere. Then kids add fun features like ears, arms, feet, tails, or faces. It's an exciting way to stretch creativity and build sewing confidence!Use this guide to help kids design their own ball-shaped animals.
1. Start With the Standard 6-Piece Ball
Make the ball exactly as described in the stuffed ball sewing directions:- Cut 6 football-shaped fleece pieces.
- Sew 3 pieces together to make one half of the ball.
- Sew the other 3 pieces together to make the second half.
- Sew the two halves together, leaving a small opening.
- Stuff the ball and hand sew the opening closed.
2. Choose What Kind of Animal to Make
Kids can design any creature they imagine! Some ideas include:- Bear
- Bunny
- Fox
- Dog or Cat
- Mouse
- Monster
- Penguin or Owl
- Unicorn
3. Add Felt Ears
Cut small shapes from fleece or felt and sew them into the seam as you sew the top pieces together, or hand sew them on afterward.Examples:
- Bear → small round ears
- Fox → triangle ears
- Bunny → long oval ears
- Mouse → big circles
4. Add Arms, Feet, or Wings
These can be sewn like tiny stuffed shapes or made from flat felt.- Flat oval arms stitched to the sides
- Small round feet attached at the bottom
- Little wings for a bird or bat
- A fluffy tail or pointy fox tail
5. Add a Face
You can create faces using:- Safety eyes
- Felt circles and noses
- Simple embroidery for mouths and whiskers
- Fabric markers for extra details
6. Sew All Extra Pieces Before Stuffing
If you add ears or tails into seams, insert them between fleece layers before sewing the two ball halves together. For arms, feet, or decorations on the surface, it works best to stuff the ball, close the opening, and then hand sew these features onto the outside.7. Stuff and Finish Your Animal
Once all pieces are attached:- Stuff the body with fiberfill.
- Hand stitch the final opening closed.
- Gently shape the ball with your hands for a smooth look.
Why Kids Love This Project
The 6-piece ball becomes a perfect blank canvas-kids can create animals that are cute, silly, colorful, or totally imaginative. Each one turns out unique, and the pattern is simple enough that they can make a whole collection of their own stuffed "fatties" or ball-shaped animals.Related Beginning Projects:
~Beginning Lessons, ~Bandanna Tote Bag with an Inside Lining, ~Sew a Simple Belt, ~Bottle Bag, ~Christmas Stockings, ~Circle Pillow,~ Coasters, ~Couch Caddy, ~Dinner Placemat, ~Dress Up Your Jeans, Foam Pencil Case, ~Gathered Apron,~Hair Scrunchy, ~How to Sew Drawstring Bags, ~How to Sew Tote Bags, ~Jean Purse, ~Jean Apron, ~Lap Desk, ~Neck Pillow, ~Patchwork Tote Bag, ~Patchwork Pillow Cover, ~Pillow with Pocket, ~Pillow Cover with Ties, ~Pillow with Trim,~Pocket Purse,~ Sew a Pot Holder, ~Stuffed Animal, ~ Stuffed Ball, ~T-shirt Drawstring Bag, ~Sew a Card, ~No Sew Projects, ~Sewing Safety, ~Felt Patterns~Pillowcase Scarf, ~Felt Tooth Fairy, ~Stuffed Elephant, ~Stuffed Monster,~ Pretty Purse, ~Mini Stuffed Dog, ~Stuffed Bear, ~Baby Receiving Blanket,~ Baby doll blanket & pillow,~Patchwork Skirt, ~Reusable Snack Baggie, ~Glasses Case, ~Sew Tablecloth, ~ Pocket Pillow
Follow Kids Sewing Projects


[?] Subscribe To This Site

Copyright, Debbie Madson, Madson Web Publishing, LLC
All rights reserved.
The material on this site is for educational purposes.
Nothing on this page is public domain.

All rights reserved.
The material on this site is for educational purposes.
Nothing on this page is public domain.