Travel Sewing Kit
by Mary
(Palm Coast, FL USA)

Sewing Kit


|
|
|

|
With just a few inexpensive supplies, you can make this little sewing kit. They are great to keep in a car while traveling, stick one in a suitcase, or carry one in a purse. You never know when a repair will be needed. They would make a great little gift for a Mom or Grandmother.
If you don't have extra sewing supplies on hand to fill your sewing kit, you can purchase a mini kit from a dollar store. Most even come with the tiny scissors included!
You will need some felt sheets, sewing supplies to fill your kit, a few snaps and a button, a dowel or straight tree branch and a needle and thread.
Begin by deciding how big you want your kit to be. Mine is 5 1/2" tall X 4" wide which means that I cut my felt pages 8" X 5 1/2". Make sure that you take into account when deciding on what size you want the pages to be, that you will be using about an inch of the width when you sew the binding.
Since this is a traveling sewing kit, it is probably better to keep it small so that it fits in a purse or glove box. Don't make too many pages or it will be too bulky when closed.I used 4 pieces and when folded, gave me 8 pages inside including the cover.
Cut your pages from the felt in the size you have chosen. Remember that each will be folded in half, just like a book. Find the center of each and slide a pin there so you can see where to put things like pockets in the correct places. Start with the page that will be your cover. Cut a strip for the closure tab.
Just fold your cover in half and cut a strip that will be long enough to reach from front to back to hold the kit closed. Round off the corners on one end of the strip. Fold the strip in half and cut a small slit. Sew around the slit with stitches to reinforce it. Put this aside with the button until you are finished.
Decorate the front cover. I made a flower from felt that I stitched on and sewed little beads in the center. Then I cut two leaf shapes. I sewed one directly onto the front. On the other I sewed the words "Sew Sweet" and then let it hang loose by thread from the flower.
To hold needles, I used a flat magnet. I punched some holes in it and sewed it to a page. I threaded two needles and laid them on top of the magnet which keeps them on.
To attach straight pins and safety pins, make a flap on one page. Just cut a square that fits on your page and sew along the top edge. Slide the pins onto this flap.
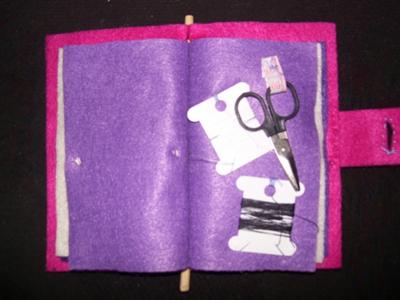
To include some thread, cut 2 pieces of thin cardboard into spool shapes. Punch a hole at the top of each. Wrap some white and black thread around them. Sew them to a page through the holes.
To attach scissors, cut a small piece of elastic or ribbon. Sew your snap pieces onto the ends and then sew this to a felt page. Unsnap and slide one end through the scissors and then snap the loop closed.
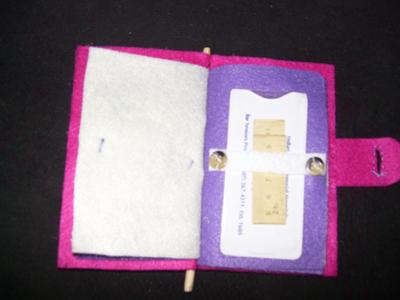
To hold things like buttons or a needle threader, you can make mini pockets. Just cut a small rectangle. Fold up one end about 2/3 of the way up. Then fold over the top so it now looks like a little envelope. Now that you have an idea of what it will look like, open it up and sew a snap at one end. You can round off these edges for the flap. Take the other half of the snap and sew it on to the front where it can meet the other half. Snap it closed and sew the two sides and the bottom onto one of the pages. Open it and place buttons inside.
You can make another type of pocket by using a strip of felt to keep it closed instead of a snap. Sew your pocket on just like the one above but with no snap on it. Lay a strip of felt that is a little wider than your pocket, across the flap. Sew the ends of this strip to the page. Just slide the flap out, put your goody inside and slide the flap back under the strip.I put buttons in one pocket and a needle threader in another.
If you include things like a measuring tape or mini magnifying glass, just cut a strip slightly wider and sew the ends onto a page. Slide the object under it.
Run a glue line down the center of your most inside page. Lay the dowel on the glue. Let it dry. Layer your pages into book form and whip stitch over the dowel and through the pages along the entire spine of the book.
Sew the button onto the front, about an inch or two in from the edge. Put the tab you made in the beginning onto the button. Flip the book over to the back and sew the end of the strip to the back cover. You want it to be snug enough to keep the book closed but not so tight where it makes it stretch too much.
Related
Beginner Projects:
~Pre
Beginner Lessons, ~ Sew
Bean Bags, ~ Cell
phone holder, ~Sew
ornaments, ~ Easy
Snowman Craft, ~ Easy
Dishtowel Apron, ~ Felt
Organizer, ~ Fleece
Hat, ~ Heating
Pad, ~ How
to sew a pillowcase, ~ iPod
holder, ~ Potpourri
pillows, ~ Pillowcase
Apron, ~ Pin
Cushion, ~Rectangle
shape pillow, ~Traveling Sew Kit, ~Stuffed
Kittens, T Shirt Fringe Bag ~Tie Belt, ~ Stuffed
Fatties Ball Animals,,
~Mouse
Cat Toy,
~Hand Sew Potholder,
Comments for Travel Sewing Kit
|
||
|
||
|
||
Sewing Materials Available


All rights reserved.
The material on this site is for educational purposes.
Nothing on this page is public domain.
