Shirt into Shorts or Pants
How to Turn a T-Shirt into Kids Shorts or Pants
Turning an old T-shirt into shorts or pants is a fun way to recycle clothing and make something new. This project works especially well for kids because T-shirt fabric is soft, stretchy, and easy to sew.
For this tutorial, you can make shorts or long pants depending on how long your shirt is. We used an adult T-shirt, but a larger siblings shirt or a T-shirt dress works great too.
For this shorts project, we made a pair of pants, instead of shorts, for a little brother. We used Dad's old t-shirt. You can use these directions to teach you how to sew pants or shorts.
You will need:
- Fabric pencil or chalk
- Large shirt (adult or oversized)
- Pair of your shorts you (or whomever you are making this for) wear now (to use as a pattern)
- 1 inch wide elastic
Sewing Materials Available

How to Make a Shirt into Shorts
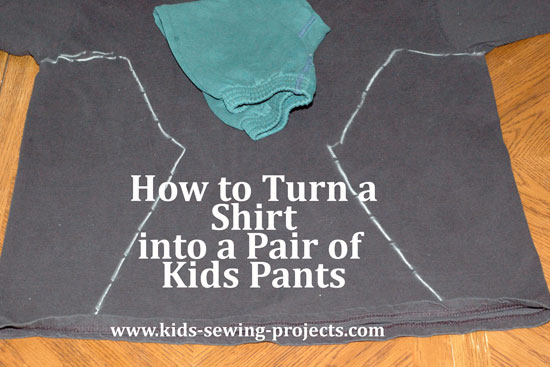
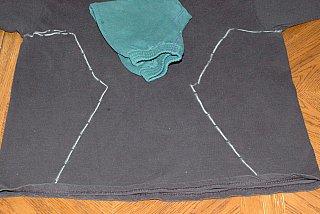
Step 1: Prepare Your PatternLay the T-shirt flat on a table.
Fold the shorts (or pants) you are using as a pattern in half lengthwise.
Place the folded shorts on top of the shirt with the long leg seam lined up near the edge of the shirt.
Tip: If the shirt is not wide enough along the seam, you can place the shorts anywhere on the shirt. This will just require sewing an extra leg seam later.
Step 2: Trace and Cut
Using your fabric pencil or chalk, trace around the shorts.
Add ½ inch all the way around for seam allowance so the shorts dont turn out too small.
Use the bottom hem of the T-shirt as the bottom of the shorts whenever possiblethis saves time since its already finished.
Flip the shorts over and trace the second leg.
Cut out two leg pieces.
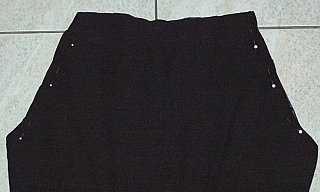
Step 3: Sew the Leg Curves
Open the two pieces and place them right sides together.
Pin along the curved edges (the front and back curves).
Sew along the pinned curves.
Step 4: Sew the Crotch Seam
Pull the fabric so the legs line up and the shorts lay flat with right sides together.
Pin and sew the crotch seam from front to back.
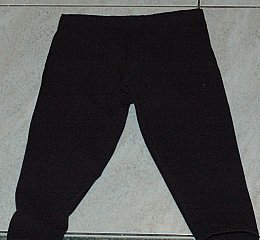
Step 5: Make the Elastic Waistband
(See Lesson #4 on sewing elastic)
At the top edge, fold the fabric down ¼ inch, then fold down again ½ inch to create an elastic casing.
Pin and sew along the folded edge, leaving a 12 inch opening to insert the elastic.
Step 6: Insert Elastic
Measure elastic around the waist. Add about 2 inches extra so it stretches comfortably.
Attach a safety pin to one end of the elastic and thread it through the casing.
When both ends come out, pin them together and try the shorts on.
Adjust the elastic if needed.
Sew the elastic ends together securely.
Pull the elastic into the waistband and stitch the opening closed.
Finished!
Your T-shirt shorts (or pants) are now complete!
This is the same basic method used in many pants patterns, making it a great skill-building project for kids. Shirt-to-shorts projects work especially well for toddlers and young children, and theyre a fun way to reuse clothes you no longer wear.
Related Kids Lessons Projects:
~Kids Sew Lessons, ~Applique Shirt Project, ~Bath Mitt, ~Binder Cover,~Christmas Cone Ornaments,~Cloth Basket,~Cloth Basket Tray with Ribbon Corners, ~Cloth Dinner Napkins or Bread Cloths,~Easy Sew Curtains,~Fairy Costume, ~Headbands,~Jean Skirt,~Pillowcase Skirt, ~Prairie Points,~Sew Purse, ~Recycle Your Old Tie Projects,~Reversible HeadBands, ~Shirt into Shorts Project,~Shirt and Transform it into a Dress,~Tie Pillow, ~Tie Skirt,~Tiered T-shirt Skirt, ~Wall Hanging, ~Shorts, how to sew, ~Entertainment Bag
Follow Kids Sewing Projects


[?] Subscribe To This Site

Copyright, Debbie Madson, Madson Web Publishing, LLC
All rights reserved.
The material on this site is for educational purposes.
Nothing on this page is public domain.

All rights reserved.
The material on this site is for educational purposes.
Nothing on this page is public domain.