Fabric Bookmark with Ribbon
A simple, quick, confidence-building sewing project for kids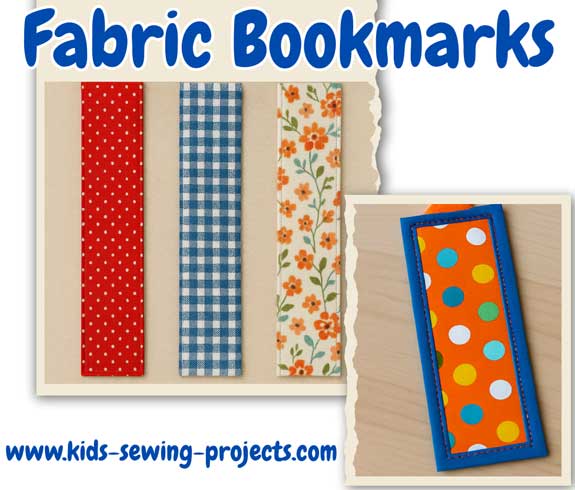
Fabric bookmarks are one of the easiest sewing projects for kids of all ages. They use small scraps of fabric, look adorable, and make great gifts for teachers, friends, or holiday surprises. Adding a ribbon “tail” gives the bookmark a fun flutter and helps kids find their page easily.
Materials Needed
- 2 fabric rectangles (2" x 6" or 2.5" x 7" work great)
- Matching or contrasting ribbon (6–8" long)
- Sewing machine or hand needle
- Iron (optional but helpful)
- Scissors or pinking shears
- Pins or clips
- Fabric marker (optional)
Let kids choose coordinating scraps to practice color matching and design choices. They love seeing how the bookmark transforms once it's sewn and turned right-side out.
Step-by-Step Instructions
1. Cut Your FabricCut two matching rectangles from your chosen fabric.
You can go skinny and long, or short and wide—just keep both pieces the same size.
TIP: If working with younger kids, pre-cut several rectangles and let them choose their pair.
2. Prepare the Ribbon
Cut a 6–8" piece of ribbon.
Fold it in half like a “V,” with the ends together and the loop at the top.
This folded ribbon will be inserted inside the top seam.
3. Pin the Layers Together
Lay one fabric rectangle right side up.
Place the folded ribbon at the center of the short top edge with the loop pointing inward.
Lay the second fabric rectangle right side down, sandwiching the ribbon inside.
Pin or clip all around the edges.
4. Sew Around the Edges
Sew all around the bookmark using a ¼" seam allowance.
Leave a 1.5" opening at the bottom for turning.
Make sure to sew over the ribbon ends to secure them firmly.
5. Turn & Press
Turn your bookmark right-side out through the opening.
Use a pencil or chopstick to gently push out the corners.
Press flat with an iron if available.
6. Sew the Opening Closed
Topstitch around the entire bookmark about ⅛" from the edge.
This:
- Closes the opening neatly
- Adds a polished look
- Helps the bookmark stay flat in books
- Two-sided bookmarks: let kids choose different prints for front and back.
- Decorative stitches: choose zigzag or flower stitches for the topstitching.
- Personalized names: write the child’s name with a fabric marker.
- Use felt instead of fabric: no turning required!
Great lesson for practicing fabric right sides, layering, and sewing a straight line.
Perfect for using up scrap baskets.
Makes an excellent “warm-up” project before zipper pouches or small bags.
Sewing Materials Available

[?] Subscribe To This Site

Copyright, Debbie Madson, Madson Web Publishing, LLC
All rights reserved.
The material on this site is for educational purposes.
Nothing on this page is public domain.

All rights reserved.
The material on this site is for educational purposes.
Nothing on this page is public domain.