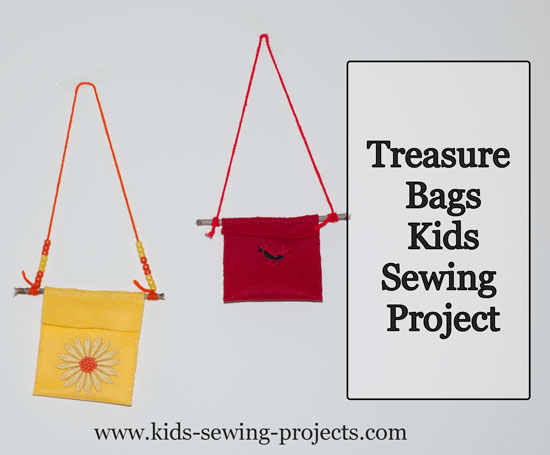
Treasure Stick Bags
These treasure stick bags are simple to make and kids can keep small treasures inside. It is a perfect kids sewing project for those young sewers who are learning to hand sew. The outside stitching adds character to the bags.
Sewing Materials Available

Treasure Stick Bags Tutorial
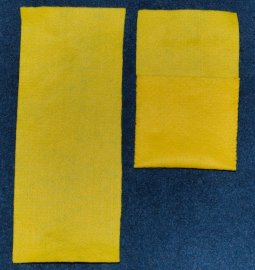
You will need:- One piece of felt per bag, 4 ½ x 11 inches (you can vary the length if desired)
- Thread and needle
- Small stick
- Yarn, thin rope or twine
- Beads, buttons or decorative patches, if desired
Lay your felt out flat and fold 4-5 inches of the
bottom up.
Sew along the edges of the felt leaving the top open. Use a whip stitch which is done by poking your needle through the fabric and wrapping around edges of the fabric. Place a stick on the top of the pouch where you will fold the felt over to make the top.
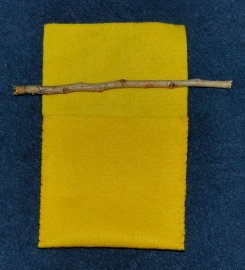
Sew the stick to the top of the felt. Tie the end of your string to the ends of the stick on each side. Decorate with beads, buttons or artwork if desired.

Here are two treasure stick bags. The yellow is with a 4 1/2 x 11 inch piece of felt. The red is with a 4 1/2 x 8 inch piece of felt.
Foam Purse
by Mary Ruthven (Palm Coast, FL.)
Another fun purse idea similar to the treasure stick bags above.
Items Needed:
- 1 sheet of foam (appx. 5X7")your choice of color
- Mini beads (your choice of colors)
- Pony beads (your choice of colors)
- String for handle (length depends on how long you want it)
- Small piece of thin elastic for closure
- 2 buttons
- Needle and thread
Here's a fun project with simple stitching and you can make it
using any color foam and beads. Maybe in your school colors and
you can use letter beads to spell out words such as your name or
favorite team!
Take a foam sheet (approx. 5 x 7) and fold bottom up about 3/4 of
the way. Take the remaining amount and fold it over the top, which
will be the flap of the purse.
Draw a line on the inside where the bottom fold will be. Open foam
and stitch mini beads across the top flap. Thread mini beads and
attach to bottom of purse, working your way across the line you
drew. Be sure the line will be inside the purse where it does not
show.
Fold foam into purse shape and hold closed with your hand. Stitch
around the two sides. Remember that you are working with foam so
don't pull too hard like you can with material. Knot at the end.
Now take the piece of thin elastic and tie the ends in a knot.
Place it in the center on the flap and lay button on top. Sew the
button on making sure you sew a few times through the
elastic.Close flap and determine where the other button needs to
be. You want it far enough down so elastic holds purse closed
firmly but not to much where it causes foam to rip when used.
Sew other button on. Slide pony beads onto your string and knot
both ends. Sew each end onto purse for the handle.
Congratulations! You just made an original purse. This would make
a great project for girl sleepovers!
Related Hand Sewing Projects:
Pre Beginner Lessons Level 1, ~Drawstring Coin Bag, ~Basic hand stitches, ~Hand Sewing Felt Patterns, ~Button Flower~ Draft Critter, ~ Felt Bookmark, ~ Felt Mittens, ~ Needle Book, ~ Treasure Stick Bags, ~Key Chain Animal, ~Puppet Gloves, ~ Hand sewn teddy bear sleeping bag & pillow, ~Halloween Totes, ~Backpack Charms, ~Rag Doll, ~Button Flower, ~Sew Ornaments, ~Sew Felt Doll,
Follow Kids Sewing Projects


All rights reserved.
The material on this site is for educational purposes.
Nothing on this page is public domain.
